
MachineLove 101: How to Make Bias Tape without a Tape Maker (and with)

It’s here! I am pleased to finally bring you this tutorial on how to make bias tape without a tape maker (and with 😉 ). When I first began learning how to sew and more importantly how to manipulate fabric; I didn’t have all the sweet tools I was coming across in all the video tutorials I found online. Many of these tutorials on how to make bias tape were helpful but, it would have been nice to come across a guide that was for a sewer like myself; one who didn’t quite have all the helpful tools for their projects yet. While making bias tape without a tape maker is not a difficult task to accomplish, it does require a little more attentiveness and I hope this tutorial will help you in your effort to make beautiful bias tape!
What the heck is bias tape?!
 I didn’t know myself up until about two years ago what bias tape was. Once I discovered how to use it though, it not only improved the quality of my work but I now enjoy making it! Bias tape is pieces of fabric sewn together in a long strip. It can be utilized in a number of ways such as the finish for raw edges, going around corners and as decoration. Use it to finish quilts, collars, pant bottoms, just about anything you’d like. Pre-made bias tape can be bought in craft stores or online but, being able to produce your own opens up a greater world of creativity for your work. You get to pick the fabric and the size; the possibilities are endless! I’ve read some bloggers state that bias tape is not necessary but, believe me, you will see the quality of your work improve when you take the time to utilize it.
What You’ll Need:

- Fabric of your choice (how much tape will you need for your project? the bigger the project the more tape you’ll need and the more fabric.)
- Rotary cutter; if no cutter try with scissors
- Rotary mat
- Ruler
- Chalk or something to mark your measurements with
- Pins
- Iron
- Thread
- Your Machine ❤
This tutorial is catered to those who don’t have a store bought bias tape maker, however, I will be including directions for utilizing this tool as the steps come up. Don’t worry, if you don’t have a maker just skip these steps and continue on. Also, I wanted to share that in my experience with making bias tape, in regards to ironing, I have never accidentally burned or singed myself while using the iron. I know that this can be a concern for some but, it is possible to keep a safe distance while ironing and still produce a beautiful tape. Don’t get discouraged; I find making bias tape a fun challenge now and I hope you’ll feel the same. Once you have all of your materials and you’ve designated a table top for your work area, we’re ready to get started!
Step 1) Find and fold along the bias

Lay out your piece of fabric on the rotary mat, or on your table top if using scissors. Let’s find the bias so we can cut and make our strips for the tape. The bias is the diagonal line of direction across woven fabric. Cutting along this line of direction gives our fabric a nice stretch; key for going around edges and corners. Once you have your fabric laid out, grab one of the corners and bring it down over the top, making a nice fold as pictured above. This is where we will cut to make our bias tape.
How big do you want your tape?
No matter how big your tape, it will be folded into four equal parts and only a quarter of the size will be seen when attached to your work. So let’s say you’re finishing up a quilt and you decide you want the border to be 1 inch wide. For a 1 inch wide border you would cut your bias strips 4 inches wide (1 inch x 4 = 4 inches). Or maybe you’re making a shirt and you want the collar to be half an inch (.5 inches), then you’ll cut your strips 2 inches wide (.5 inches x 4 = 2 inches). Maybe you want your bias tape to be smaller and you want the finish to be 5 millimeters wide, then you would cut your strips 2 centimeters wide. (5 mm x 4 = 20 mm / 20 mm = 2 cm) When using a bias tape maker it may very in terms of the measurements they use. For the bias tape kit I have it uses millimeters and states the size on the maker. However, the size it states is half the size of the strip needed. Again, these measurements will vary from maker to maker but I just wanted to share my experience with the tools I use.

Step 2) Mark your measurements and cut
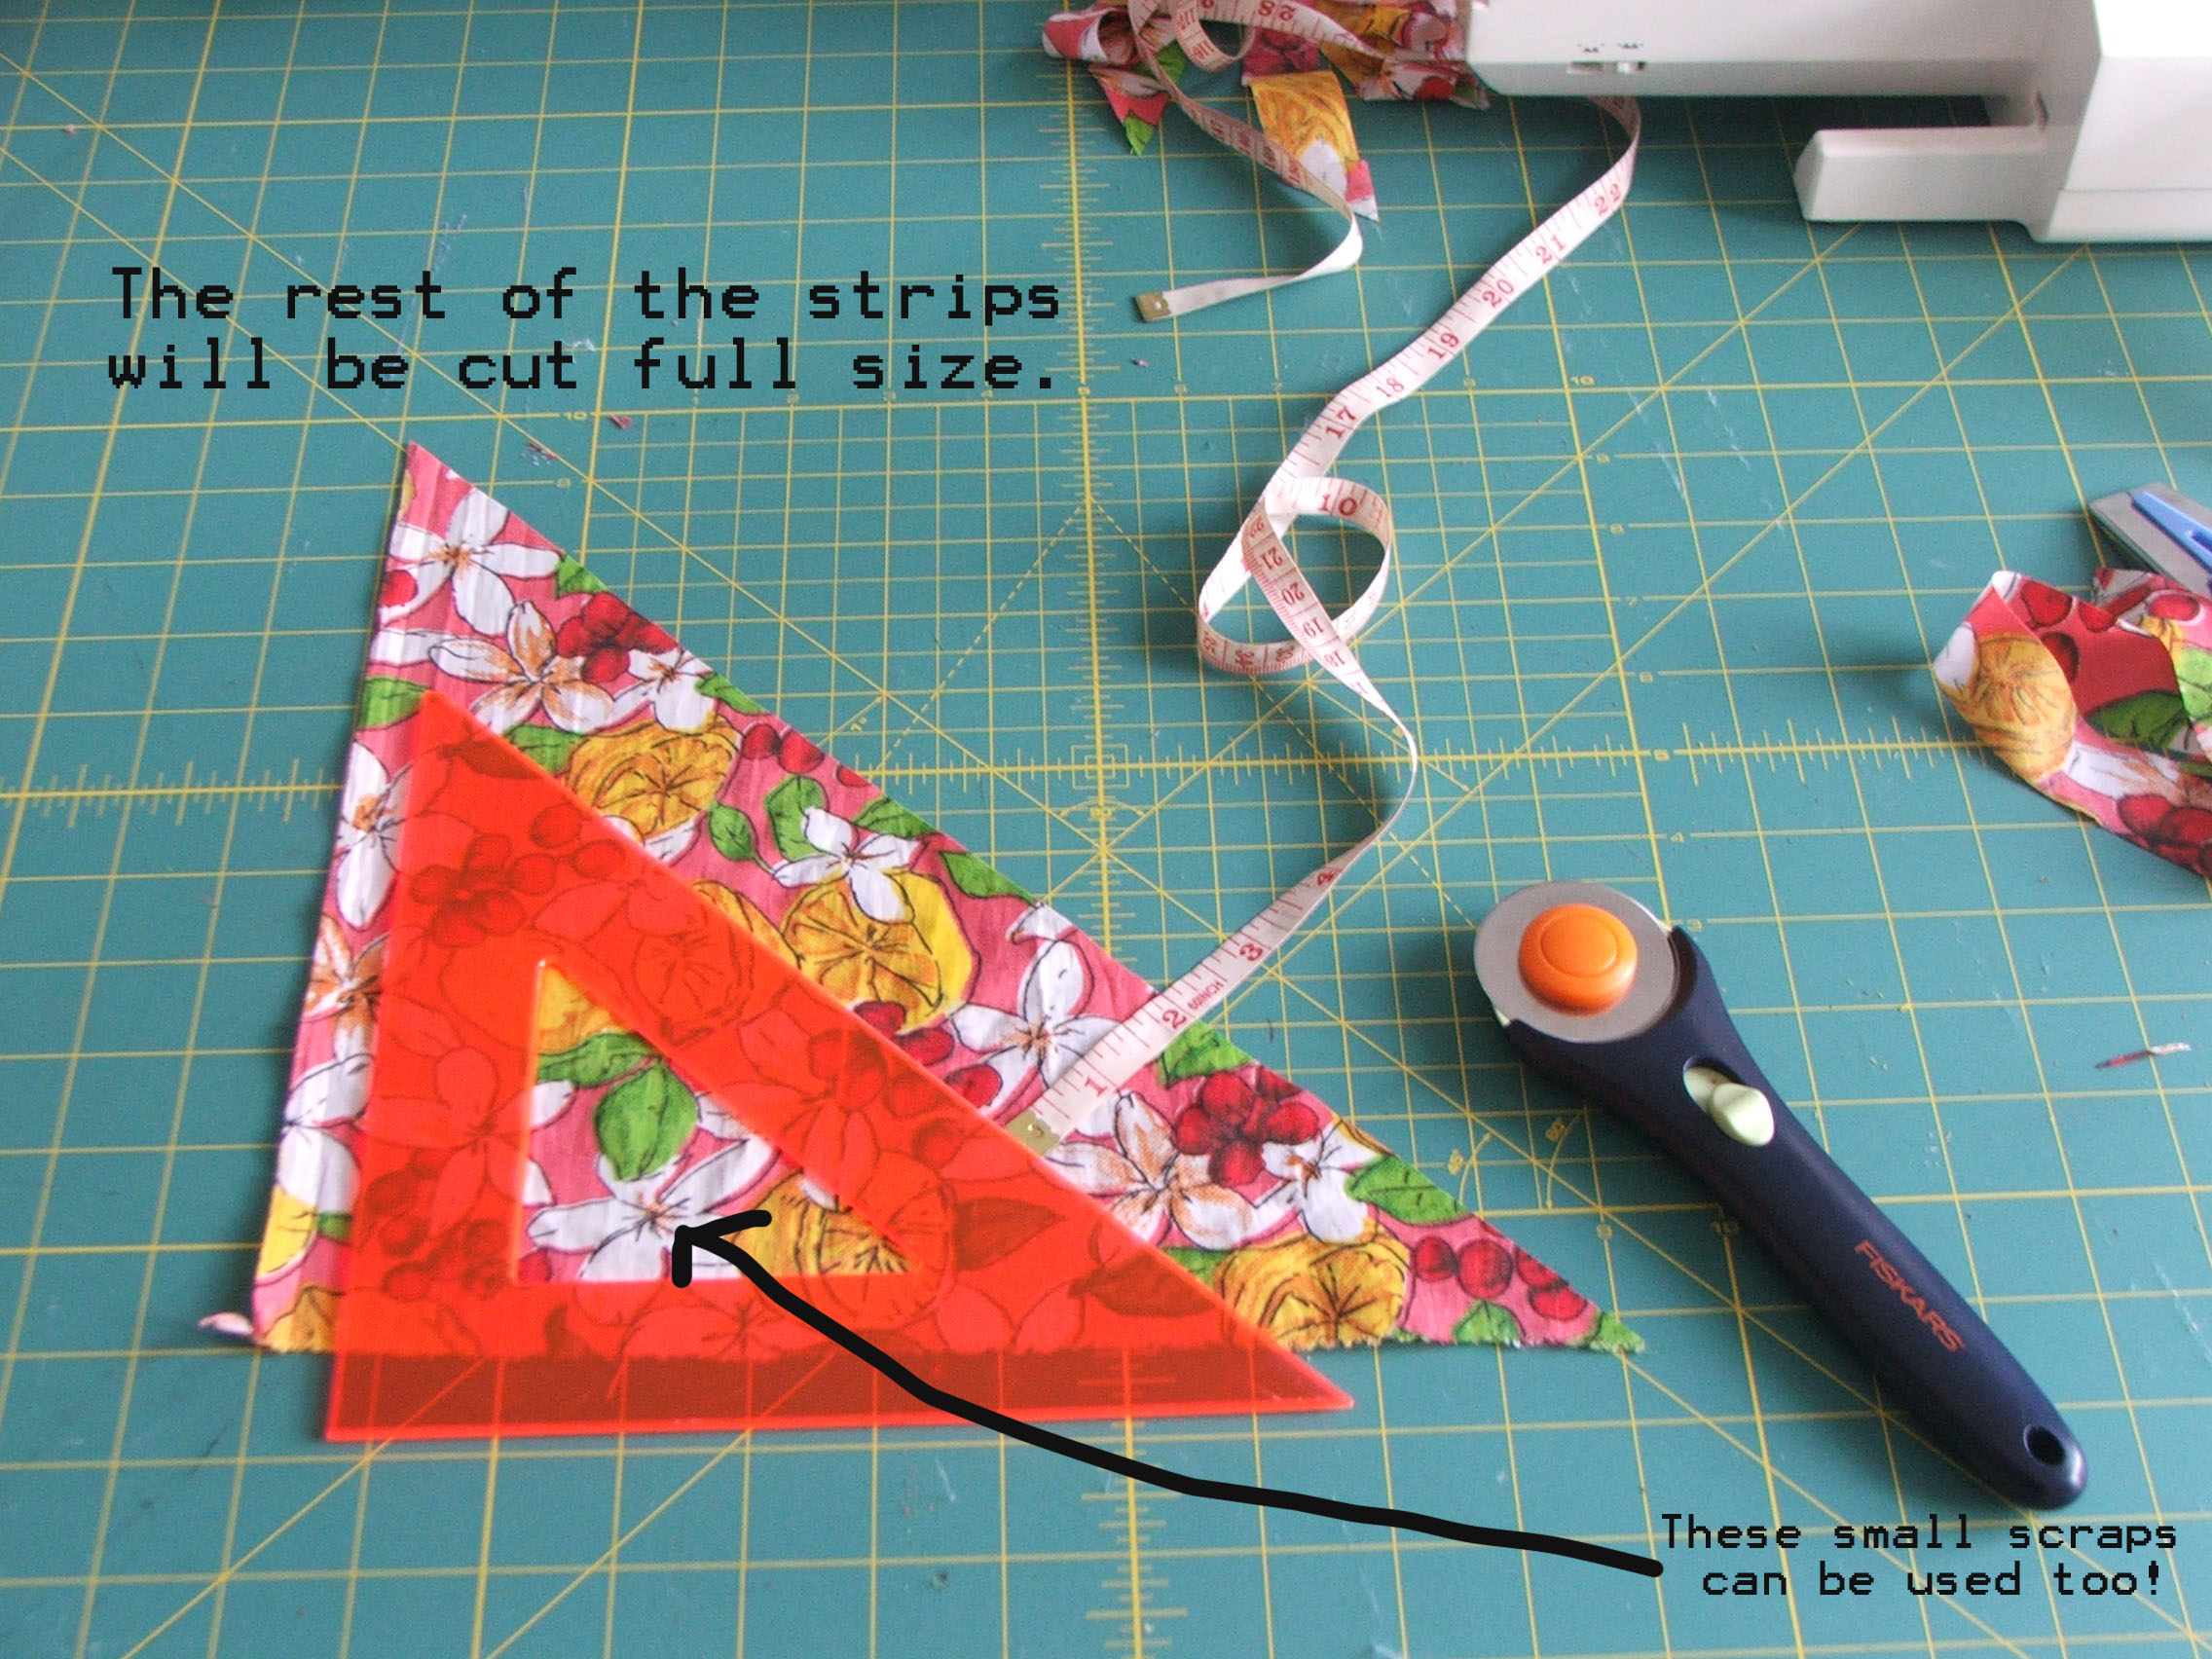
Once you’ve decided how big you want your tape to be, it’s time to measure and cut. I want my bias tape to have a finish of half an inch, so I will be cutting my strips 2 inches wide. Grab your chalk and ruler to help you measure. For the first cut, since the fabric is folded here, we will measure and mark half the size we need, so when we unfold it, we will have the exact size we want. This is just for the first cut; after this, continue to measure the rest of the strips the full size, which for me, is 2 inches.

Mark your fabric and with your rotary cutter and ruler, or scissors, continue to cut your strips along the bias. Don’t be shy about using the smaller pieces at the end, these all can be used for the tape as well. Try your best to cut each strip exactly the same length, it will make it much easier for you when connecting them later.

Step 3) Connect your strips together; pin and cut!

Look at all these awesome strips we have! Now let’s connect them. How you connect them is very important. When I made my first bias tape it was for a collar on a shirt (shown below). I was so excited about making it that, as I was pinning and sewing away, I didn’t realize I had sewn one of my strips to the wrong side.


Mistakes are going to happen, so just make sure your fabric is facing the right way when pinning them together before you sew.

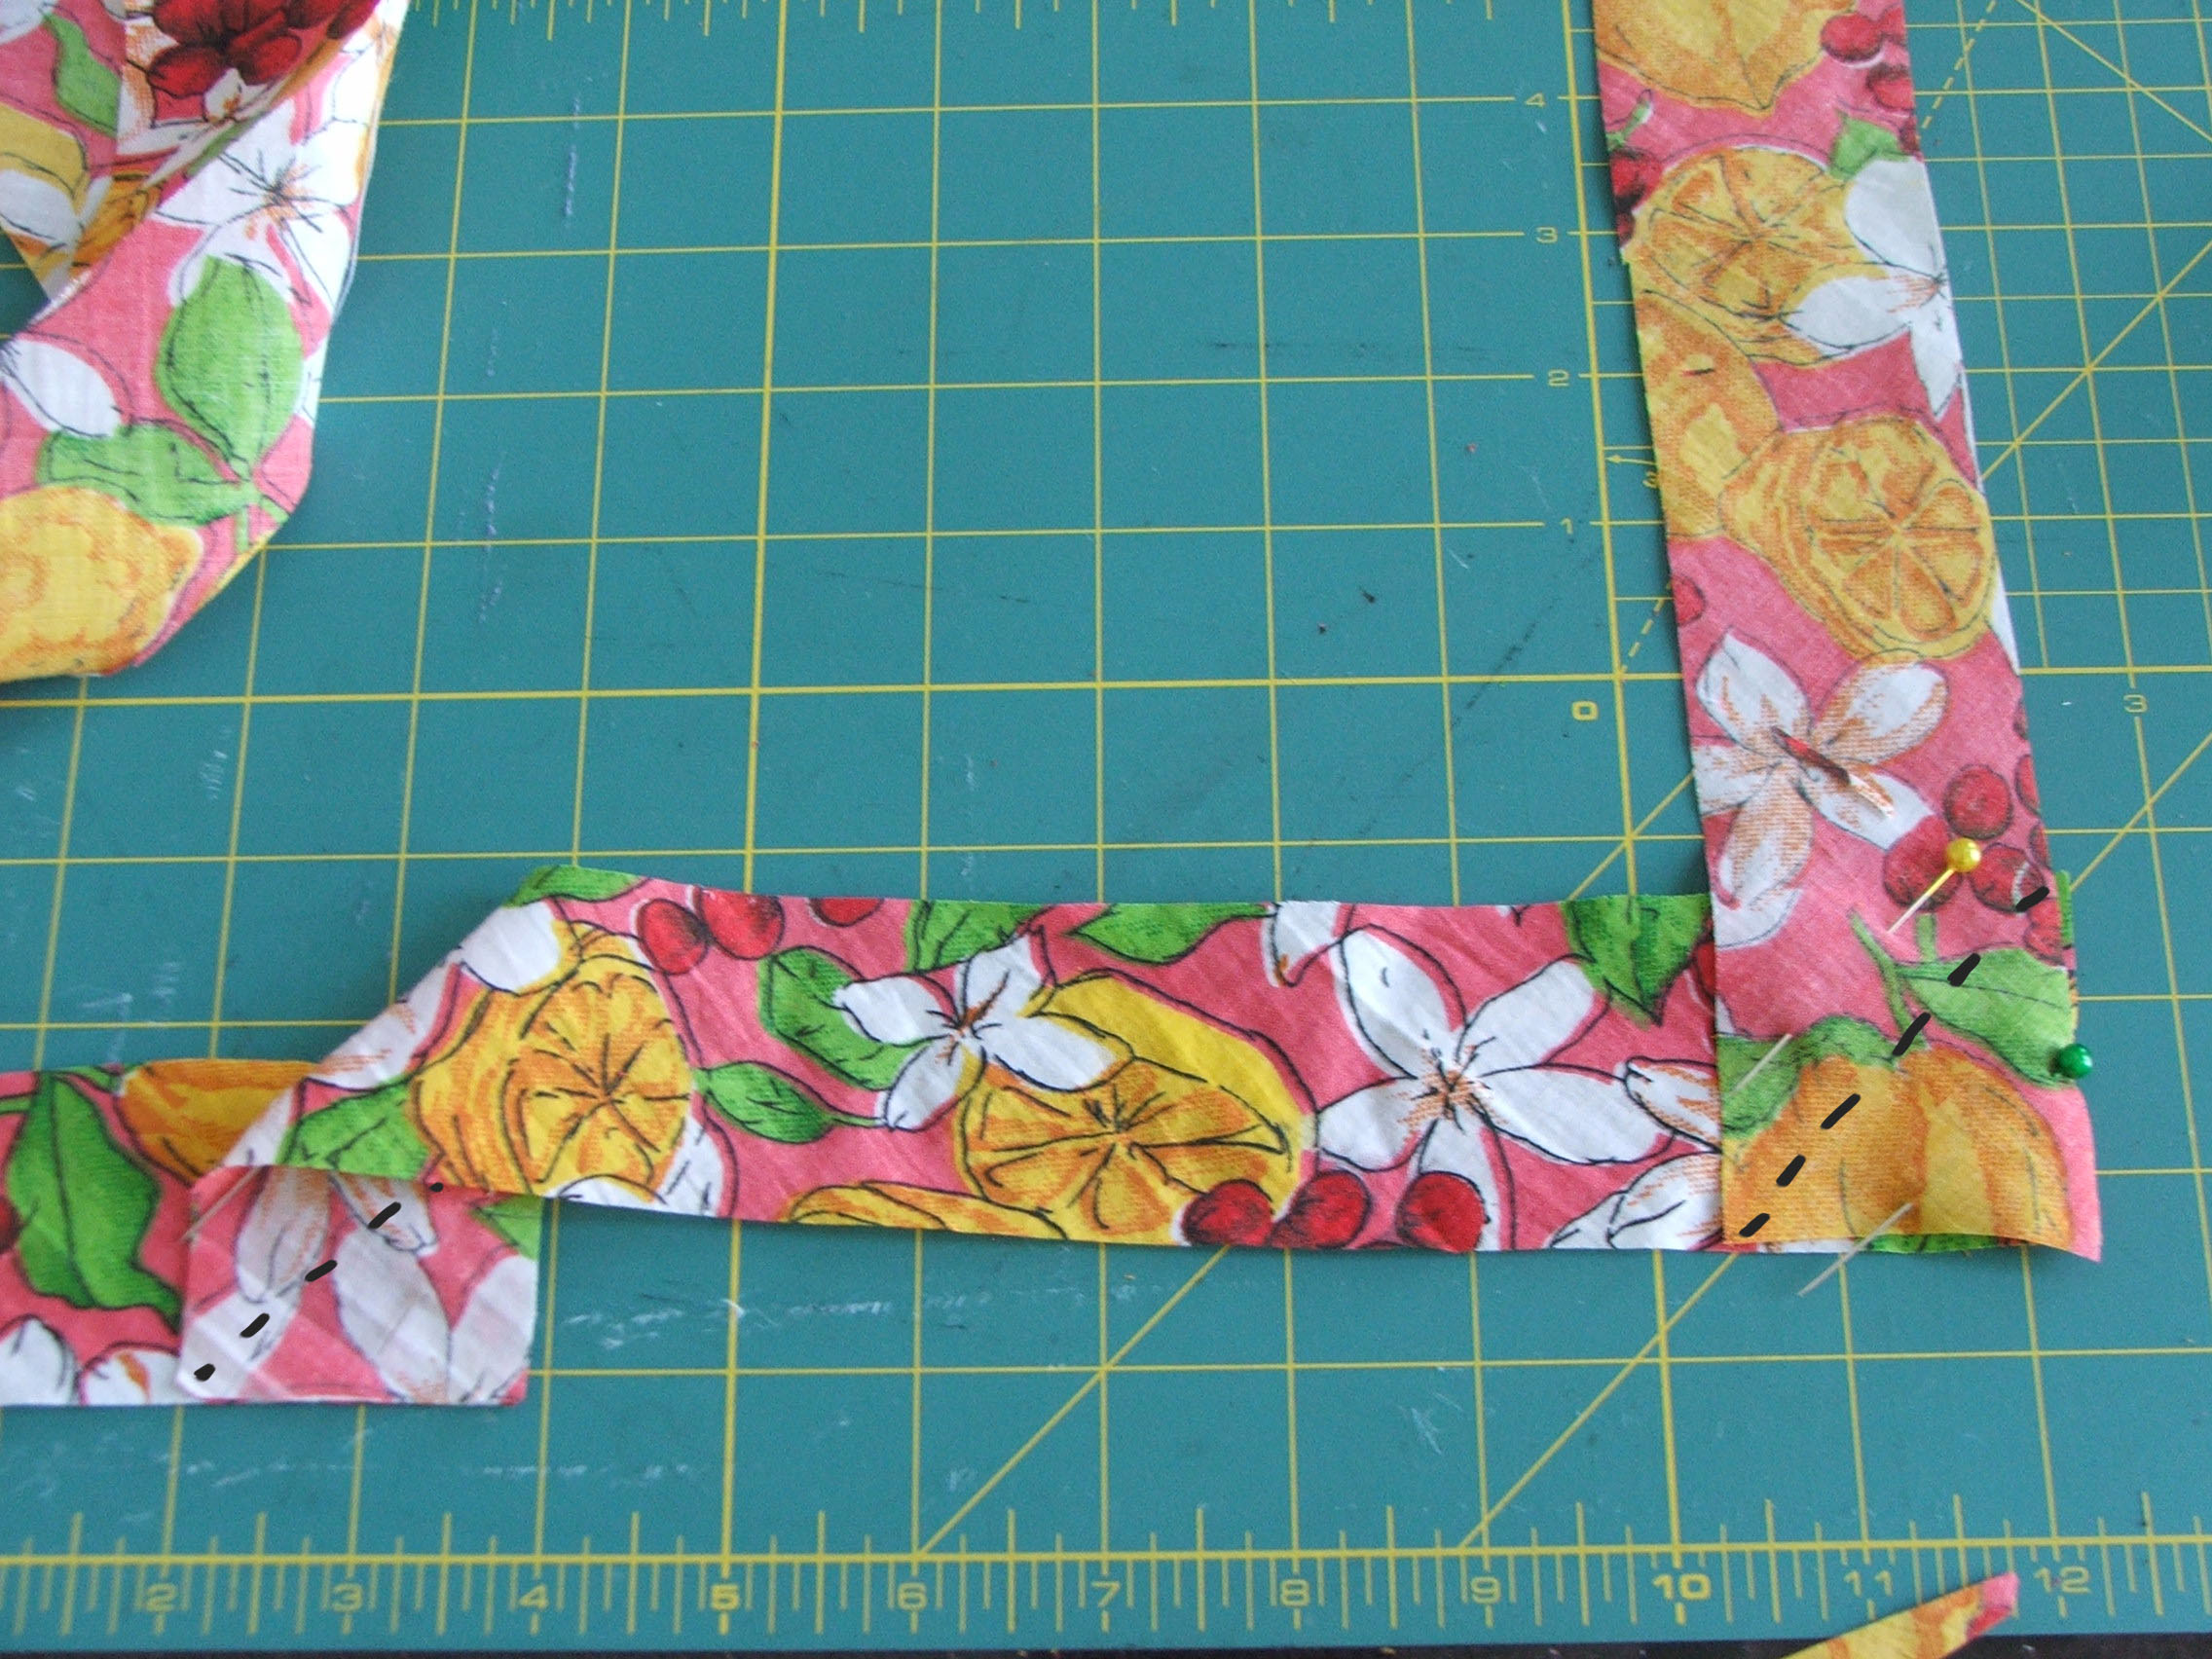
How we determine this is by laying down one of our strips, front side up. Next, grab another strip and lay it on top of the first one near the ends; front sides of the fabric facing each other, like so.

Cut off the excess tips so you have nice square edges.
Great, now pin these two pieces together. We will be sewing from the bottom left of the strips, vertically up the middle to the top right corner. Place your pins parallel to this line.

Now, grab the strip on top and bring it down, folding it over the pins, as shown below. When folded, the second strip should now have the front side of the fabric facing up as well. You can now pin on your next piece, following the same steps. Repeat this until every strip is used and pinned together. See photos below for examples.

Step 4) Sew your strips together; get that iron hot too!

Yay! Now that we have all of our strips pinned together, it’s time for some machine love! Load your machine up with some thread, minding the thread tension. Sew along the middle of the pinned strips. Once sewn, go ahead and cut off the excess fabric, as shown below.


Next, fold the strip back over and turn it wrong side up. Open up the flaps of the stitch and iron them.


Continue this at every pinned section until all strips are sewn together. You should end up with nice pressed stitches connecting every strip.

Step 5) Make friends with your iron

Look at us now!!! We have our tape nearly done, woohooo! This long strip we’ve sewn together will now have to be folded and ironed. My strip is 2 inches wide and will yield a half an inch wide tape. So I will be folding both sides of the fabric over half an inch. Grab both sides of the fabric, folding inward, meeting them in the middle, as shown.

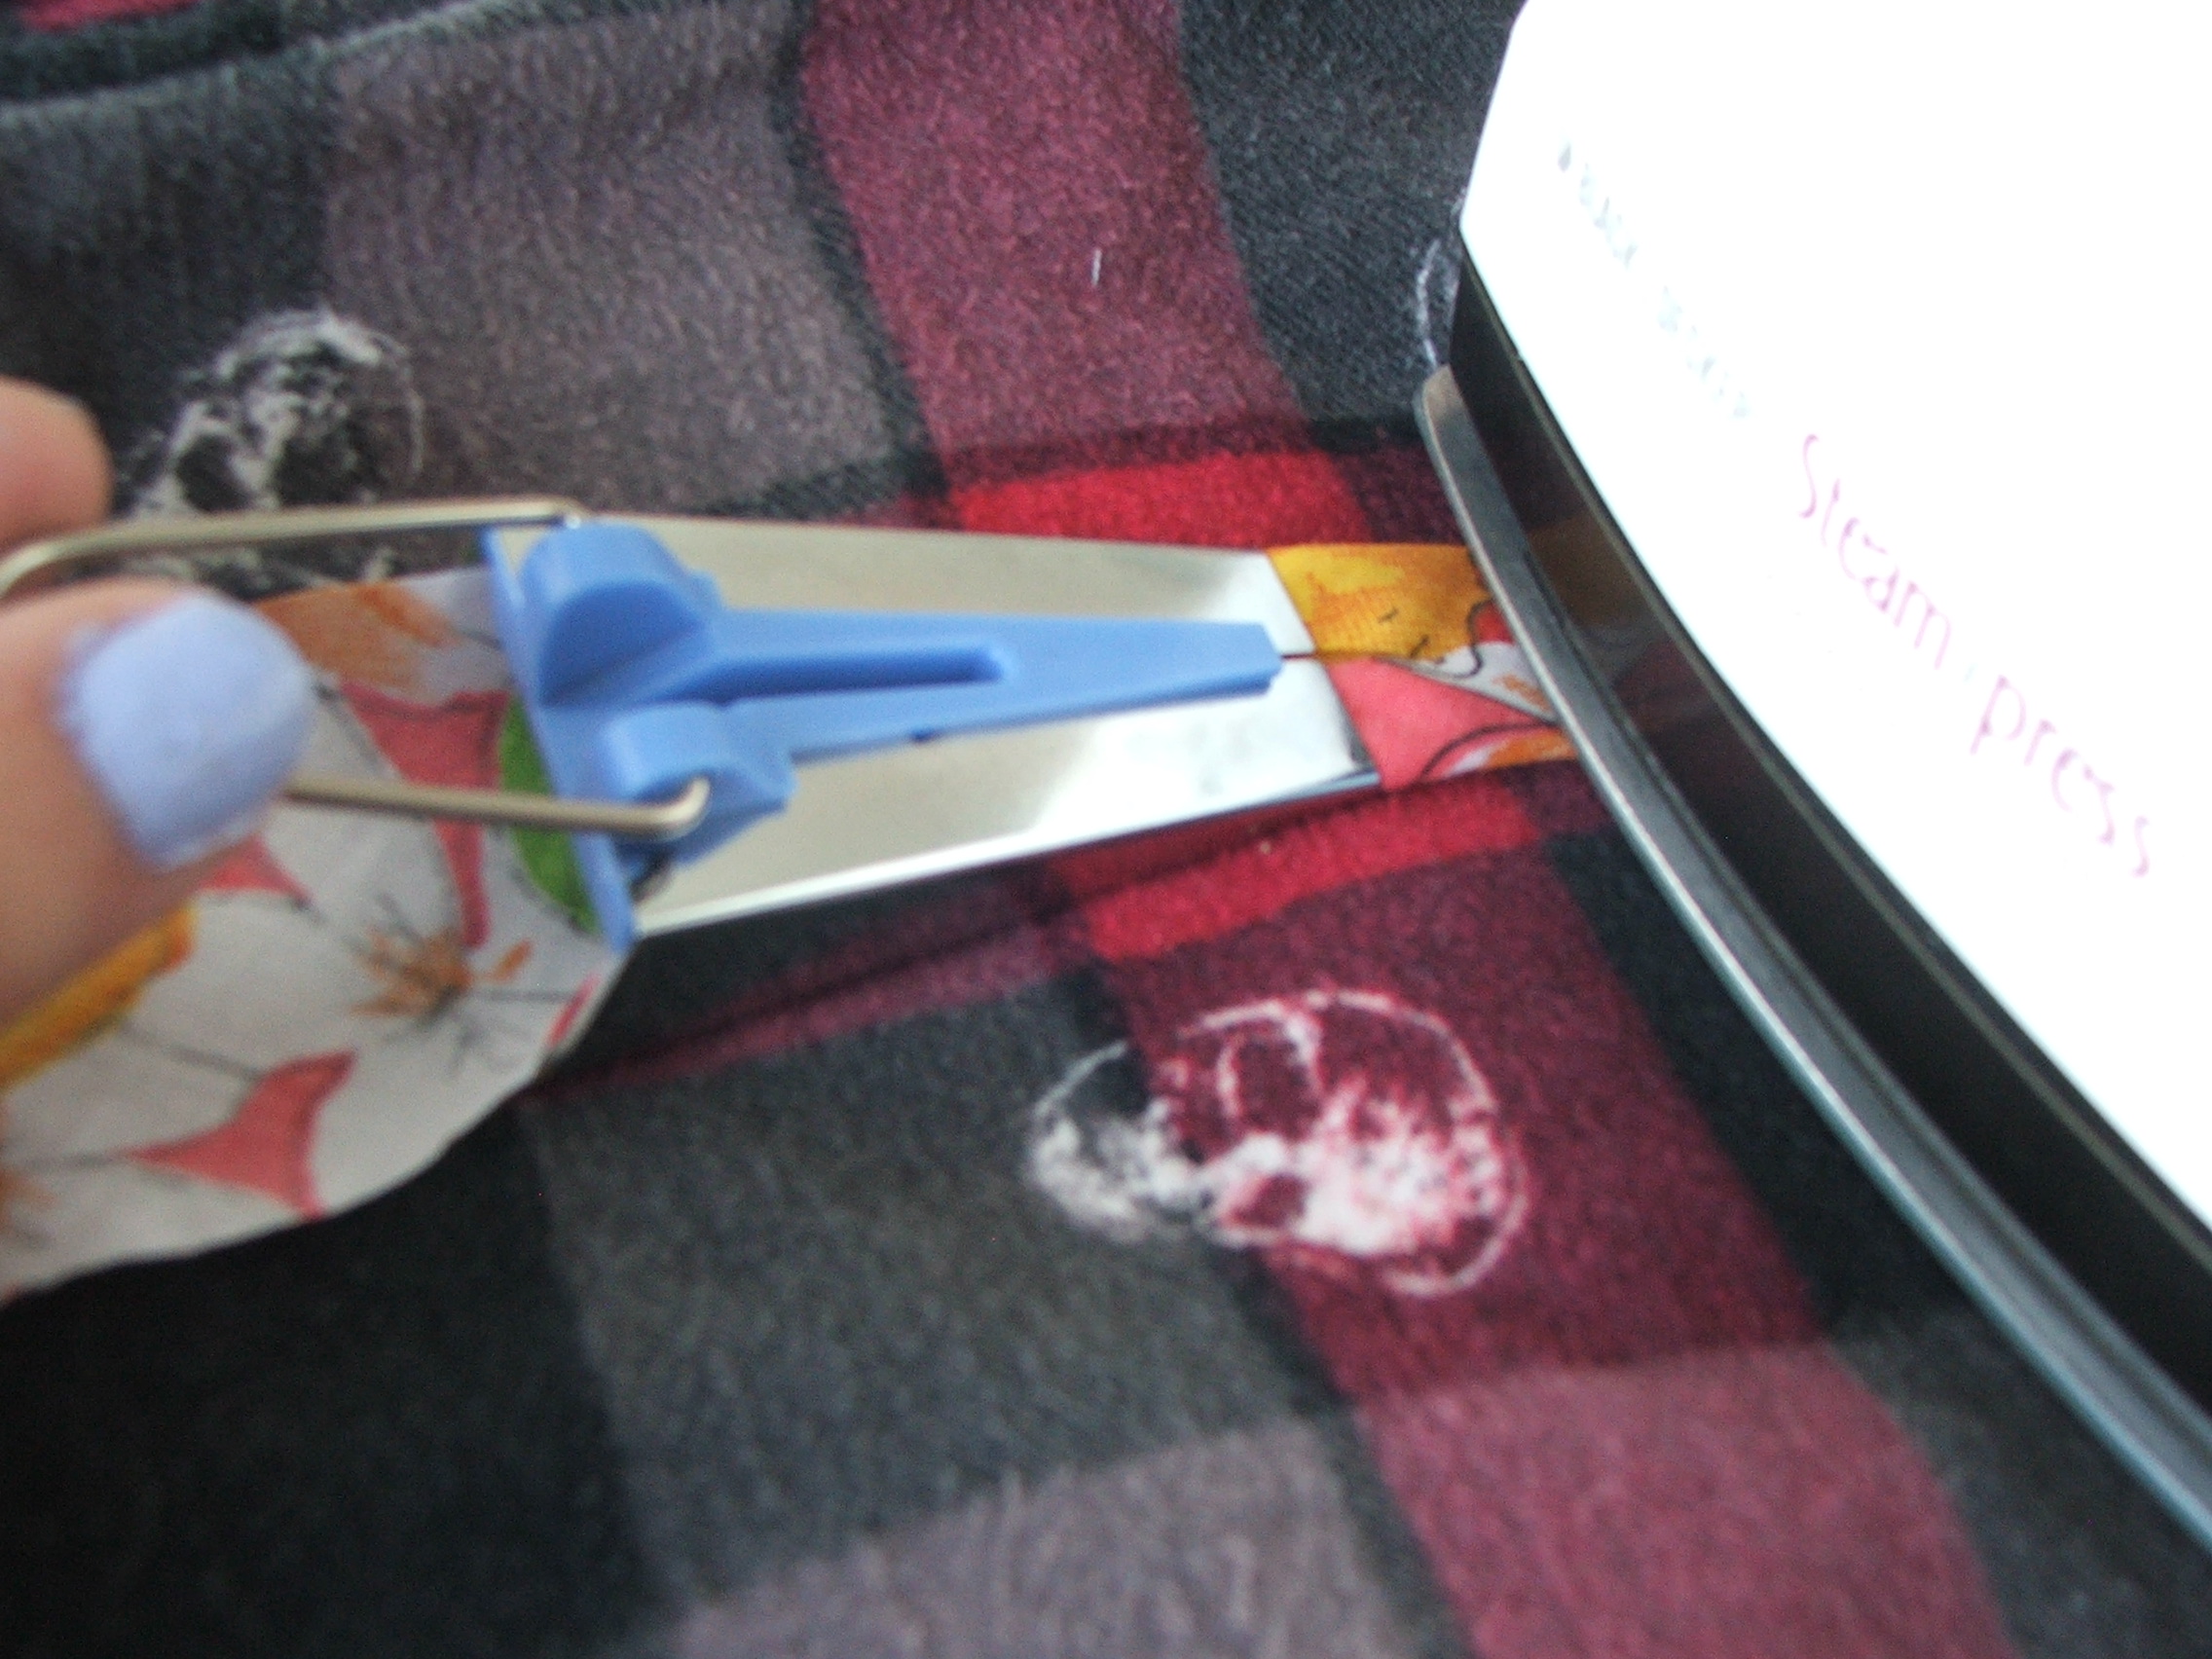
I find it helpful to use my index and middle finger, one on either side of the tape. Iron the tip and once you do, use the ring and pinky finger as well to hold down more of the fabric at a time while staying away from the iron.


Continue this until you have ironed both sides down the entire length of your sewn strips. Is it starting to look more like a tape? 🙂 Once you’ve folded and ironed all of your tape, we just have one last fold to make!

Have a bias tape maker?
I wanted to include this just in case someone was looking for a tutorial that does utilize the bias tape maker. The benefit of having a bias tape maker is that it folds the fabric for you as you iron, instead of you having to fold and hold it yourself. As I mentioned early, a kit will usually come with various sizes of makers but, it may also come with a tool called an awl. This tool is simply used for pushing the fabric through the bias tape maker. If you don’t have an awl, a long needle will do just find.

First step is to feed the tip of the fabric (wrong side up) into the wider side of the maker; curving the sides up a bit to fit snugly through the opening. Make sure you’re using the right size maker for your strips. Once you have the the tip partially in the opening, use the awl (or needle) to push the fabric the rest of the way through. Do this by utilizing the long opening at the top of the bias tape maker, as shown.


One you’ve pulled the fabric through start ironing your tape. Use the hook at the top of the maker to continue to pull the fabric through it. Continue this until you have completed the entire length of the tape.
Step 6) Where many have gone before: The Final Fold
This isn’t a necessary step but, I believe pressing a middle fold can be useful. It can be used as a guide when attaching it to another piece of fabric. Take your already folded bias tape and fold it one more time, right down the middle. Press the fold with the iron and continue this until your entire piece of tape is folded.


When you open the tape after pressing it, you should see three creases separating four parts of your strip. Did you press it all? Great! That’s it, you’re done! You made your very own custom bias tape. Pretty sweet! 🙂 ❤

That completes this tutorial on how to make bias tape without a tape maker, and with. I hope you found these steps to be helpful and I wish you continued success in attempting to make your own bias tape. I do sincerely have a lot of fun making bias tape, however a pain it may seem, hahaa! 😉 In my next tutorial I will show you how to attach your custom bias tape to your projects. Stay tuned MachineLovers! ❤
::Athena::

2 comments