
Category: Do It Yourself!
DIY: Tock doll from The Phantom Tollbooth

Hello Machinelovers!
I am very excited to share this do it yourself tutorial of the memorable character Tock from the cherished children’s book “The Phantom Tollbooth” by Norton Juster.
I actually had no knowledge of this book or the 1970 movie version of it. It was something that never filtered into my childhood experiences. Fast forward to today – my kid absolutely loves this story. While he hasn’t read the book yet, he adores the movie and characters throughout.

The story follows a boy named Milo who, due to his boredom, ends up entering into an animated world called the Kingdom of Wisdom. The Old King died and the kingdom has been split into two lands; Dictionopolis and Digitopolis. Milo must now save the Princesses of Rhyme and Reason to bring the kingdom back to its original state of harmony.
Tock is the faithful watchdog he meets during his journey who accompanies him on his travels through the wonderful and wacky regions of the two lands.

This now brings me to why I came to making my own Tock doll. My niece’s 6th birthday was coming up and we really wanted to share this story and movie with her. It was decided that her gift would be a copy of the book, the movie and a plush doll of one of the characters. I immediately thought of the faithful watchdog Tock and assumed there must be official merchandise for this story. So began my internet surf of all things The Phantom Tollbooth.

To my surprise, I was unable to find anything remotely close to a “The Phantom Tollbooth” plush toy. They just don’t exist, and if they ever did, I was unable to find any trace of them now. I did, however, find another blogger who shared their own homemade plush doll version of the character Tock, but it didn’t offer a downloadable pattern or tutorial of the project to make your own.

Fear not though, Machinelovers! I’ve done the work for you (sort of). Here is my take on The Phantom Tollbooth’s loveable character Tock, the watchdog. To save time, I did buy a pre-made dog doll, but this opens this DIY up to people of all skill levels. I simply made Tock’s pocket watch out of felt and sewed/glued it to the doll’s chest. Keep reading for the step by step guide on how to make your very own Tock!

Here’s What You’ll Need:
- (1) Dog plush doll
- (1) 4×4 inch white felt square
- (1) 4×4 inch black felt square
- (1) 4×4 inch gold felt square
- White thread
- Gold thread
- Black thread
- White tracing pencil
- Straight needle
- Hooked needle
- Scissors
- Shears
- Hot glue gun
- Tracing cup (or something to make your circles unless you’d prefer to freehand)

Step 1:
Use the tracing cup (or freehand) and white tracing pencil to draw the body of the gold pocket watch and white face of the clock onto the white and gold felt squares. Don’t forget to include and draw in the watch clicker at the top of the gold circle (see step 2 for example of clicker at the top).

Step 2
Use the scissors to cut out the pocket watch body and clock face.

Step 3
Use the white tracing pencil to draw the numbers, hands and ticks of the clock face onto the black felt square.

Step 4
Cut out the numbers, hands and ticks of the clock from the black felt square. (I originally tried doing this with regular scissors, but found the size of numbers and pieces needed to make this work were too small to be cut with a regular pair. I ended up switching to my sewing shears for the small detailed pieces and they turned out decent. Now that you have all of the pieces necessary to make Tock’s clock, you can begin stitching/glueing them together.)

Step 5
Use the straight needle and white thread to hand stitch the white clock face to the golden pocket watch body. Put a dab of hot glue behind the white felt piece before placing it down and hand stitching it, for extra durability. (I totally biffed this step and forgot to hand stitch the clock face. I ended up just hot gluing it to the gold felt and by the time I realized I missed this step, the watch was already half stitched to the dog. So, I don’t have a photo of this step, but don’t forget to do it, as the stitch work adds to the overall quality of the finished look.)

Step 6
Use a hot glue gun to glue down the black felt numbers, hands and ticks onto the clock face. (I did not attempt to hand stitch these, as I had limited time for this project, but you can absolutely hand stitch these pieces on instead of gluing.)

Step 7
Use the black thread and straight needle to add detail line work to the clicker on top of the pocket watch.

Step 8
Use the hooked needle and gold thread to hand stitch the completed pocket watch onto the chest of the dog doll. Half way through, add a dab of hot glue in between the back of the felt watch and dog’s chest, for extra durability. Press down. Continue hand stitching until the pocket watch is completely sewn to the dog’s chest. (I did not have a hooked needle handy, but I highly suggest using one for this step, as it will make it easier to stitch the clock onto the dog and make your stitches look cleaner. I was, however, able to successfully stich it on with a straight needle, but it was difficult and made my stitches look very messy. Thankfully, I was able to cover my shotty stitch work with the dog’s fur, mostly).

There you have it! Your very own Tock, the watchdog doll from “The Phantom Tollbooth”.

I truly hope you enjoyed this tutorial. I had so much fun putting this together and I thoroughly enjoyed this DIY project as this is a really fun story and character. I do hope you try this guide for yourself. If you’d like to use the same materials I did for this project, such as the dog doll, felt, needles and threads etc, including the book and DVD, follow the affiliate links below for the items. I do get a kick back (commission) if you purchase your materials via these links, so thank you so much for supporting this blog if you do!

I plan to bring you more DIY projects and tutorials this year. Not sure exactly when, but do stay tuned here for more sewing and all things crafty.
Links for materials needed:
- Golden retriever dog doll
- 4×4 inch multi-color felt pack (this pack comes with four black squares, three white squares, one gold square, one straight needle and enough black, white and gold thread needed for this project)
- White tracing pencil
- Shears
- Hot glue gun
- Hooked needle
- The Phantom Tollbooth paperback book
- The Phantom Tollbooth remastered DVD
Happy crafting!! ❤
-Athena

DIY Wall Decor – Calling all Tiger lovers!

Woosh!
Wow, long time – no post! I can’t believe how long it has been since I added anything to this blog. Sewing and arts & crafts are still a part of my life, but a lot has definitely changed since I started this blog journey! Where to begin… well, I’ve had a kid with another one on the way. So life has made a big turn for sure and I’m looking forward to adding more crafting into it again.
This leads me to this rad paper tiger wall decor!

Super easy instructions to follow and all you need are a printer, scissors and glue! I thought this was a really cool piece of art to have in my room. Pick your preferred paper color and scale the size to get a bigger or smaller tiger. Very cool!
You can find the download for the tiger template here with additional details and instructions. Let me know how yours turns out and post some photos!
Looking forward to more posts and tutorials for you guys, stay tune machine lovers.
~ ❤
Sew What’s in Your Wardrobe? – Duster Cardigan

Finally a new addition to my wardrobe! It’s been a quick minute since I’ve made any clothing for myself and I thought it was about time. The latest piece to my closet is a duster cardigan in a salt and pepper knit fabric. This cardigan has been on my mind since I saw blogger Mimi G make it and I’m so stoked to have one of my own now!

This duster was made with pattern New Look #6735. The pattern is for a regular cardigan but, I altered it to add length.I decided that I wanted my duster to fall to my ankles so it wouldn’t have a chance to drag. The duster has three buttons down the front, belt loops and a black canvas belt. The knit fabric was 6$ a yard, which I got 2 of, and the black canvas was 8$ a yard which I used only a small piece of. The New Look pattern I got for 4$ downtown at Michael Levine a year ago and it most likely is still just as cheap.

I absolutely love this piece. It’s so stylish and dramatic; a great addition to my fall wardrobe. I urge you to check out Mimi G’s video for a great tutorial on this custom duster cardigan and sew what’s in your wardrobe. I look forward to wearing mine more as the weather gets cooler and in the meantime I’ll just use it as my morning robe! 😀 ❤
-Athena-
Let’s Sew – Episode 3
The latest episode of Let’s Sew is up. More live streaming of tracing, cutting, and sewing to be had for all! Once I complete this bag I will continue with the video series but, not only live stream. That way for those who prefer videos that aren’t hours long will have something as well. Check it out and subscribe to my Youtube channel for updates on when I go live and post! ❤
-Athena-
Let’s Sew – Episode 2
Let’s Sew – Episode 2 – Making a Handbag
Video series where I share my projects and progress with you! ❤ Watch as I continue making a handbag out of teenage mutant ninja turtles cotton fabric!
Catch me live streaming Episode 3 tomorrow on Youtube! And check out my past projects here on MachineLove.
Let’s Sew – New Video Series
The beginning of my new series “Let’s Sew”, where I live stream projects and share my progress.
Watch me make a handbag and show you how it’s done! Part 1 is here. Check it out and catch me tomorrow May 22nd, live streaming part 2 @ 1:30 pm pacific time on youtube. Link below!
Using TMNT fabric. I got that turtle power!!
WARP CANDY BAGS – That Leopard Babyyy!

Hello there! Happy 2016 to you! It’s already three months into the new year and time is just zooming. I had my sweet somethings in February and some green beer last week, so now I’m ready to share with you what I’ve been working on.
Last time we touched base I was gearing up for a little event called Burning Man. I had such an amazing time out there in Black Rock City and I did indeed end up giving away the two light jackets I made in my last post to two wonderful burners (you know who you are! <3). Since getting back from the desert, which was in September, I’ve felt like I’ve been in a bit of a slump.
Unhappiness with my current job and an unwillingness to fully make up my mind about whether to continue school has kept me in a constant state of angst, exasperation and uncertainty. I continue to tell myself that crafting is what I enjoy the most yet, I find myself dwindling from my sewing machine.
In an attempt to steer myself back to my love for all things crafty, I decided that what I really needed in my life was… sweet handbags! (>*o*)>

Yes! Months ago I found this fabulous handbag pattern at Michael Levine. I took it home and put it with my other patterns only to forget about it. Well, later I decided that I wanted to start designing my own fabric. So I took a wicked drawing of a pirate my brother drew and manipulated it in Adobe Photoshop to make a fabric design. After I was happy with the design, I had this company called Spoonflower print and ship my fabric to me. I loved it so much I knew I had to make my first handbag out of it.
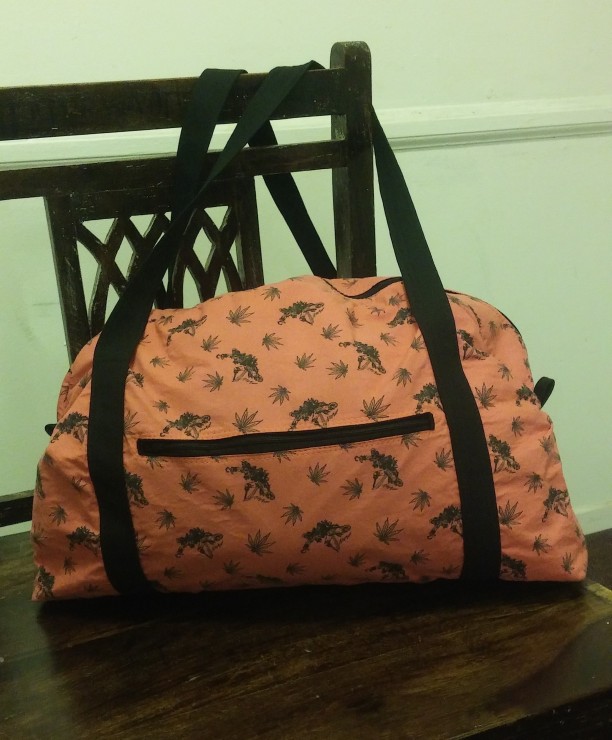
I named the fabric Pirate on the High Seas and as seen above, I chose to go with a salmon color. I knew my friend Danielle would absolute love the fabric too, so I gave her the bag for her birthday. The bag was such a hit that her grandmother requested I make one for her in a leopard print. I obliged and this is the end result of that fly LEOPARD BABYYY! 😀

For these handbags I used pattern #M6532 by McCall’s. Each bag called for two zippers; one for the top opening and a convenient zipper pocket in the front. For the lining, bottom, inside pockets and handles of each bag, I used a black duck canvas I got for $8 a yard. The custom fabric I used on the first bag was printed on Kona cotton for $15 a yard. The leopard cotton fabric was purchased for $10.75 a yard and I used fusible interfacing that cost $2.50 a yard. All fabric, besides the Kona cotton, I bought from Michael Levine in downtown LA.
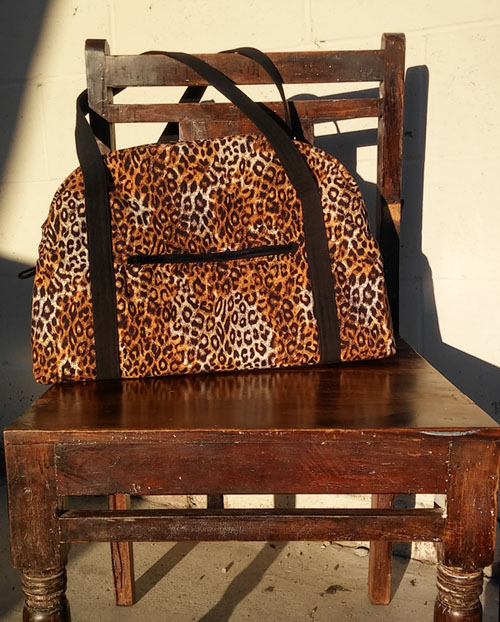
Now this leopard bag is ready to be gifted! I was really excited about how the bags turned out and I will continue to make these in custom fabrics and assorted colors. If you don’t have the time to make a bag but would like your own Warp Candy Bag <3, check out my online store. Link on my About page. I’ll be listing bags up there as soon as they are complete, so feel free to browse. Thanks for staying with me MachineLovers. Catch you later!
Athena
Pocketed Shorts: Sew What’s in Your Wardrobe?
Happy Monday everyone! I hope this post finds you well and that you had a good weekend. Last week was a lot of fun for me as I got to celebrate birthday wishes with friends and caught a Marilyn Manson and Smashing Pumpkins show. It was tons of fun! I grew up with both artists’ music but I was never an avid fan of either until recently. Both of their new albums have great music and I appreciate them more as artists now that they are older and still making sounds they love. I had a great time but now I’m ready to get back to work and make some stuff… I’m on a roll over here!
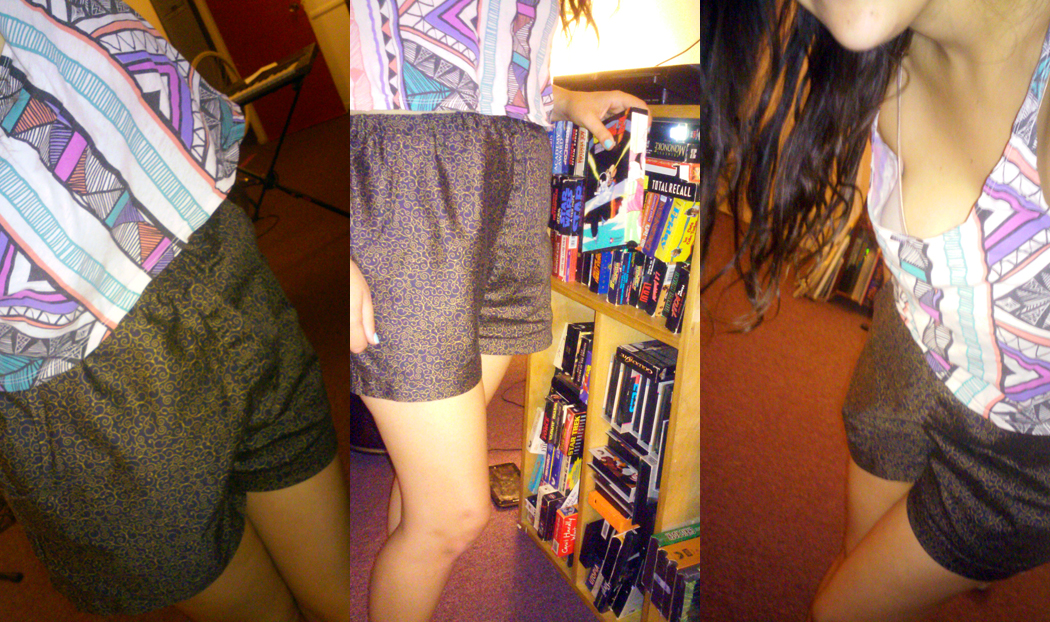
It’s been such a nice summer so far here in LA that I was compelled to make some sweet shorts to go with my summer wear. If you didn’t catch my post last week, one of my goals this year is to have my wardrobe completely handmade. Making your own clothes really gives your wardrobe an edge and authenticity you can’t find with bargain bin clothes or high-end designer wear. You’ll soon realize that your handmade clothes are more valuable than any store-bought clothes because they are one of a kind, made by you! Sew what’s in my wardrobe these days? I’ve been slowly adding to it and this pair of shorts is my latest addition. Check it out! 😀
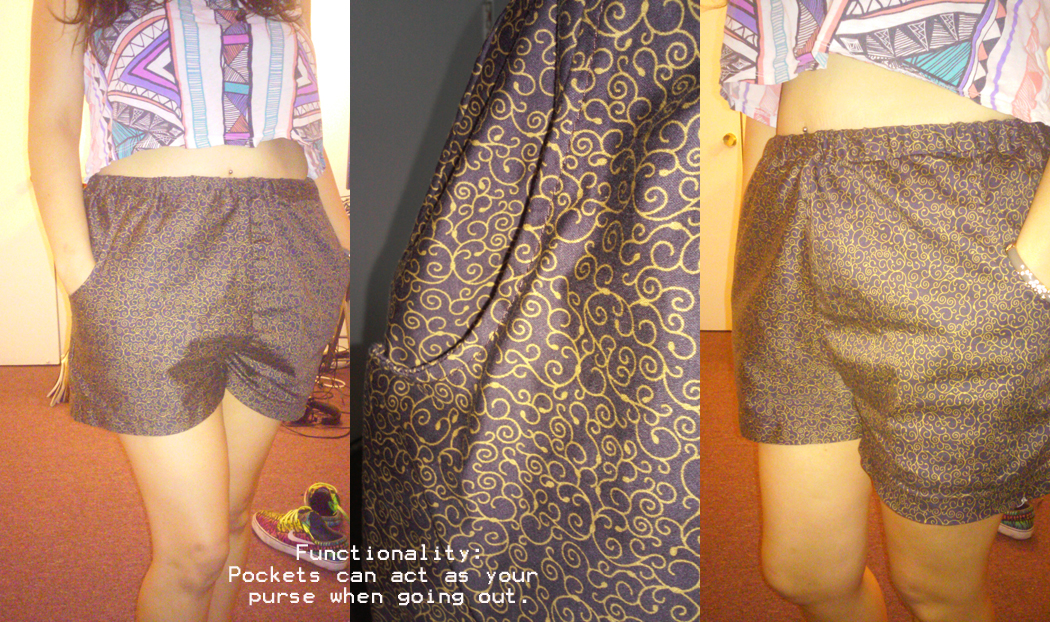
If this fabric looks familiar to you it’s because it’s the same fabric I used to make a bolster cushion a few weeks ago. You can check out that post here. I really love this fabric and knew that I wanted to make some clothes with it. I decided to make a pair of shorts I could accessorize for any occasion. A big factor for me when going out is not worrying about carrying my belongings. I don’t enjoy carrying purses when I go out on the town, especially in Hollywood. For me, a good pair of pockets can double as my purse. This is something I’m always considering when making my own wardrobe; functionality. Besides the piece of clothing looking great, how else can I utilize it? The fabrics’ design is classy enough that I can pair these shorts with heels and go out for cocktails or just roam around the neighborhood for a nice stroll.
If you recall, I got this fabric at about 6$ a yard from Joann’s. After making the bolster cushion, I still had enough of that yard left for this pair of shorts. I’m still in the process of learning how to make my own patterns, so for this particular pair I used a store-bought pattern. I picked up this Butterick pattern at Michael Levine’s I believe. I don’t recall the price but you should be able to find it online with the pattern number. I’ve made a few pieces with these already and as the packaging says, they are fast and easy. This was originally a pattern for pocketed pants. I loved how the pants I made with this pattern turned out that I thought it would be a great idea to alter it for some shorts. I used an elastic band ($1.25 a yard) to secure the waist and trimmed a good amount of the pattern for the shorts.

Sewing and designing your own clothes isn’t hard. It just takes patience and consistency, but everyone is capable of this skill and should take full advantage of the benefits of knowing how to sew your own clothes. Don’t be intimidated by the machine, it’s there to make your job easier! And if you’re hand sewing your clothes, I applaud you because this takes much more patience but it gets the job done too!

This concludes the latest Sew What’s in Your Wardrobe? I love these pocketed shorts and will continue to build my collection. As always I encourage you all to make your own clothes and sew what’s in your wardrobe too! 😉 Thanks again for joining me and please share any sweet pieces you are currently working on. I’d love to see them! Until next time, take care MachineLovers!
-Athena-
TMNT Skirt: Sew What’s in Your Wardrobe?

Hello there! I made it a second week in a row! If you have been following this page at all, then you know that when I write “I’ll be updating this page often now”… I don’t, haha! I’m really trying this time though, so thanks for joining me. 🙂
Besides this page, one of my other goals this year is to do a complete wardrobe over hall. If you’re anything like me, you don’t necessarily enjoy shopping for clothes but have your own distinct style and still want a sweet comfortable wardrobe. Making your own clothes can add great value to your overall style because you cut out the hassle of not finding your size or particular fabric/design you want. I don’t enjoy breaking my bank either and sometimes I just can’t justify buying a pair of shorts for X amount of dollars when I can make a custom pair for less than half the price. I’ve been slowly adding to my collection piece by piece but so far I have only made six articles for my wardrobe.
The latest addition was kind of accidental but, I love this piece so much! I went to the garment district downtown with the intention of buying this awesome TMNT fabric for a shirt I wanted to make for my brother’s birthday gift. Well, one thing led to another and the shirt I made for him was too small! It would have been smart of me to ask him his size. DUH! Ha-ha! Well, this is the result of that shirt and the newest addition to my wardrobe. I got that TURTLE POWER!

I’m a fan of the Teenage Mutant Ninja Turtles series and when I find time I still play my NES and SNES TMNT games. I absolutely love the first two TMNT movies and have them on VHS. If you’re wondering; no I was not a fan of the most recent TMNT movie. I really loved the puppetry/mechanical heads in the original live action movies and while I found myself able to sit through the “remake”, I was disappointed with the CGI turtles overall.
ANYWAY, so when I originally saw this fabric, like I mentioned earlier, I wanted it for a shirt and what I envisioned was something similar to a bowling league shirt. I used a black cotton fabric for the triangles on the side of the shirt and for the bias tape around the edges. Below is a photo of the shirt prior to me turning it into a skirt. The bias tape at the bottom of the shirt and the triangles had not been added yet.
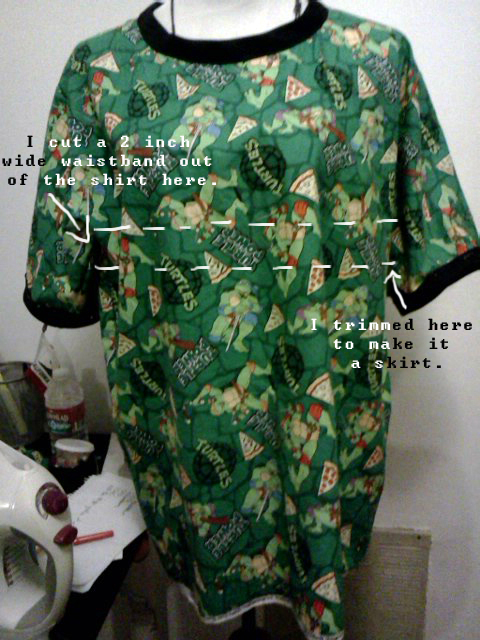
I didn’t have enough fabric left to make the shirt bigger and I considered keeping it as a pajama shirt but I ultimately decided to make it into a skirt. Basically all I did was trim the shirt and a 2 inch wide waistband from it. I attached the fabric waistband to the top and then cut and added a 1 inch wide elastic band to the inside of it. The elastic band was cut to the size of where I wanted the skirt to hang on my waist.

I absolutely love the way this skirt turned out. I’m stoked I was able to utilize the shirt and my brother didn’t mind! It was cheap too. I bought one yard of the TMNT fabric for 7$ at Michael Levine’s. The black fabric I bought for 2$ a yard at Lady Fabric.
I’ll continue to build my wardrobe and share with you all my progress. In the meantime you should sew what’s in your wardrobe! Designing your own clothes is really rewarding. When someone compliments a particular piece of clothing and asks me where I got it, I say, “I made it myself!” Ha-ha! Let me know what you create and of any suggestions you might have for my wardrobe. Till next time! 😀
..Athena..

Bolster Buds: Make Your Own Decorative Pillows

Hello there! We are well into the middle of 2015 and I’m so happy to be posting again! Trips back to Long Beach and school work have been filling up my days but I’m gearing up for a hot summer jam pack full of projects. I officially got my AA degree and have decided to not continue school at the moment. I want to now focus all of my energy on sewing and this page. Since I plan to be constantly making something, my goal is to update this page every week. This blog has always been an opportunity to share my experience and progress with others in hopes to inspire and bond with other crafty folks, but mainly to motivate myself to stay consistent with my work. So far it doesn’t seem like it has been successful, ha-ha! I started this page two years ago and so far have only posted a handful of times but, arts and crafts have been a passion of mine since I was a kid embroidering pillows for my mother’s birthday. It’s just fun and I want to continue to work on projects and meet others on their crafty journey too! So, with all that said MachineLovers, I’d like to share with you a great little tutorial I found by another crafty blogger.
I was recently asked to make a cover for a cylinder pillow. I’ve made plenty of boxed pillows but, never a round one. I decided to check out how others approached the bolster pillow and found some great tips from other artists. I ended up using this tutorial for a corded pillow over at diydesign. Since the pillow I was making the cover for was going to be used daily as a down pillow I decided not to add the cording for a more comfortable feel. This was the result:


I loved how this cover turned out so much that I ended up making another cover with the cording. It was my first attempt at cording, (or piping) but I feel it came out pretty nice none the less.


For the corded bolster I made the pillow form myself using the same technique for the cover just not adding a zipper to it. I stuffed it with some polyester fill.

The brown fabric I bought from Joann’s online for 6$ a yard and the cording ran a $1.25 a yard. For the black cover I used a black and grey knit fabric from Micheal Levine’s for $7 a yard. Polyester fill I already had but also not a pricey buy. All in all a pretty cheap alternative to buying decorative pillows at a home furnishing store.

This Bolster Bud will now be shipped to Virginia as it’s a gift! Head over to diydesign for the sweet tutorial. Oh and also on a side note, when finding the appropriate width for the body of your bolster we do indeed take the diameter of the end of the pillow form plus one and times it by Pi (3.14…). However this diydesign tutorial says that 7 x 3.14 = 19.84 which is incorrect but the author states in the user comments that this was a simple mistake. Just wanted to mention that as I was a bit puzzled for a moment reading this tutorial, ha-ha! Post photos of your Bolster Buds too! I’d love to see them!
-Athena-
